Why do I need a preamp when my interface already has preamps?

If you’re recording, you probably already have an audio interface, which of course has preamps built-in. So why is there a whole market of external preamps out there when you can buy an audio interface that already has one… or several!
Audio interface preamps are designed around transparency and cost-cutting.
When recording vocals or instruments, the quality of the preamp plays a pivotal role in shaping the overall tone and character of a track. While audio interfaces include built-in preamps, they’re typically designed to be transparent, to capture audio as naturally as possible. They’re also designed to hit a particular budget in the competitive interface landscape Additionally, many are designed for power efficiency, as many audio interfaces run on 5v USB bus power. They do the job, but are not particularly inspiring.
Preamps are another color on your sonic palette.
A dedicated preamp like the Golden Age Pre-73 MkIV elevates the frontend of your recording chain by adding analog warmth and saturation that interface preamps typically can’t. Inspired by classic British console designs, the Pre-73 MkIV imparts a distinct sonic character; expect rich harmonics, a smooth high end, and a touch of vintage-style color that can make even modest microphones sound bigger and more expensive than they really are.
Low noise, superior gain structure, and headroom
Many built-in interface preamps begin to introduce unwanted noise or distortion when pushed to higher gain levels, especially with lower-output dynamic or ribbon microphones. The Pre-73 MkIV, by contrast, provides up to 80 dB of clean, musical gain; more than enough for power-hungry low-output mics.
Add preamp drive, or don’t; your choice.
The Pre-73s mkIV’s independent gain and output controls also let you drive the input transformer for extra coloration. This, of course, raises the signal to a level that could clip the input stage of a typical audio interface; the output control lets you bring it back down to an optimal level going into the interface. This flexibility allows for creative control over the amount of harmonic grit or cleanliness desired in the recording.
Diverse tone-shaping options not found on interface preamps
There’s only so much physical space on an audio interface for control knobs and buttons, and as such, many interface preamps don’t offer the user a great deal of control. The Pre-73 MKIV, on the other hand, gives you controls for:
- Mic/Line/DI impedance settings
- Low-Z toggle switch for use with different microphone impedances (300 and 1200 Ω)
- Input gain and output gain
- +48v phantom power
- Phase invert
- Two high-pass filter options (80 and 200 Hz)
- Two high-band Air EQ options (3 and 6 dB)
- A -14 dB output pad
There are exceptions, but most interfaces will offer controls for:
- Mic/Line/DI impedance settings
- Gain
- +48v phantom power
Track with effects from the source on the way into your interface.
Because the Pre-73 MkIV brings your microphone signal up to proper line level, you’re able to insert analog processors into the signal chain before the sound ever reaches your audio interface. You can print the outboard processing straight to the DAW on the way in.
This kind of workflow simply isn’t possible with built-in interface preamps, which lack true, latency-free direct outputs. One of the most common reasons engineers reach for an external preamp is to track vocals with light compression on the way in, helping maintain consistent levels and energy during a take. Even if you don’t yet own a compressor, investing in a high-quality preamp like the Pre-73 MkIV sets you up for future expansion, ensuring your studio is ready to grow as your gear collection and recording ambitions evolve.
Superior circuits mean you capture the right tone at the source.
A dedicated preamp offers superior component quality and circuitry to that of an audio interface; in no small part because the circuit has not been designed to be shoehorned into a smaller enclosure, or to run on shared 5v USB power.
The Pre-73 MkIV employs discrete, transformer-balanced inputs and outputs; the same kind of design responsible for the legendary sound of classic British studio consoles. Transformers not only help isolate and balance signals, but also contribute nuanced saturation and low-end heft that can give your recordings a sense of depth and dimension. Compared to the sterile signal paths of most interface preamps, the result is a more engaging, mix-ready tone that requires less processing later.
A sound investment
Finally, investing in a dedicated preamp like the Pre-73 MkIV offers long-term versatility and value. As your studio setup grows, an outboard preamp can become the centerpiece of your studio’s front end; equally useful for vocals, guitars, bass, drums, or synths. Whether you’re tracking a singer-songwriter session or capturing the grit of a cranked amp, the Pre-73 MkIV ensures your recordings start with professional-grade warmth, punch, and personality from the very first stage of the signal chain.
How to connect a preamp to an audio interface
- Mute your studio monitors.
- Connect AC power to the Pre-73 mkIV and set the power switch to OFF.
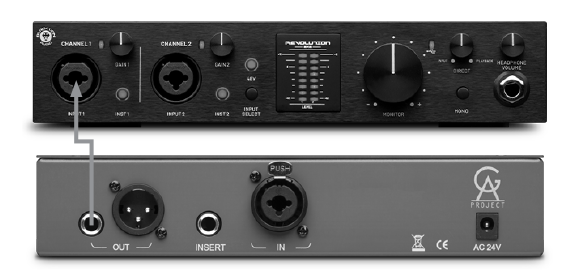
- Connect your input source via balanced XLR or TRS cables to the Pre-73 mkIV input. Microphone-level sources connect to the back panel XLR input, while instrument-level and line-level sources utilize the front panel TRS input.
- Connect your Pre-73 mkIV’s Output to your patch bay, audio interface, or subsequent signal processor using the appropriate TRS or XLR cable.
- Set all controls to the fully counter-clockwise position, and all pushbuttons deselected or to the off position.
- Set Pre-73 mkIV’s Power switch to ON.
- Engage the pushbutton options according to the requirements of the input source (DI for electric guitars/basses, Line for keyboards/drum machines; 48V for condenser mics)
- Unmute studio monitors.
- Send signal to the input and adjust Gain and Output controls to achieve desired tone/level.
Good to go!